Setting Up QField Manually
- FieldTM should be able to configure a QField project automatically.
- Failing this, the steps below help to configure a QField project manually.
1. Create An XLSForm
- An XLSForm should be created, with question types as normal (choice fields, text input, image upload, etc).
- It is essential to ensure that a question of type
geopoint,geotrace, orgeoshapeis included in the form, so that QGIS knows which type of geometries you wish to collect.- Alternatively, if you are mapping existing geometries, the geometry type can be determined by QGIS by selecting the geometry later in a later stage.
2. Convert XLSForm To QGIS
- Open QGIS and install the XLSFormConverter plugin (by OpenGISch).
- Go to the processing toolbox, and open the XLSFormConverter processing tool.
You will be presented with a set of field that need to be filled out:
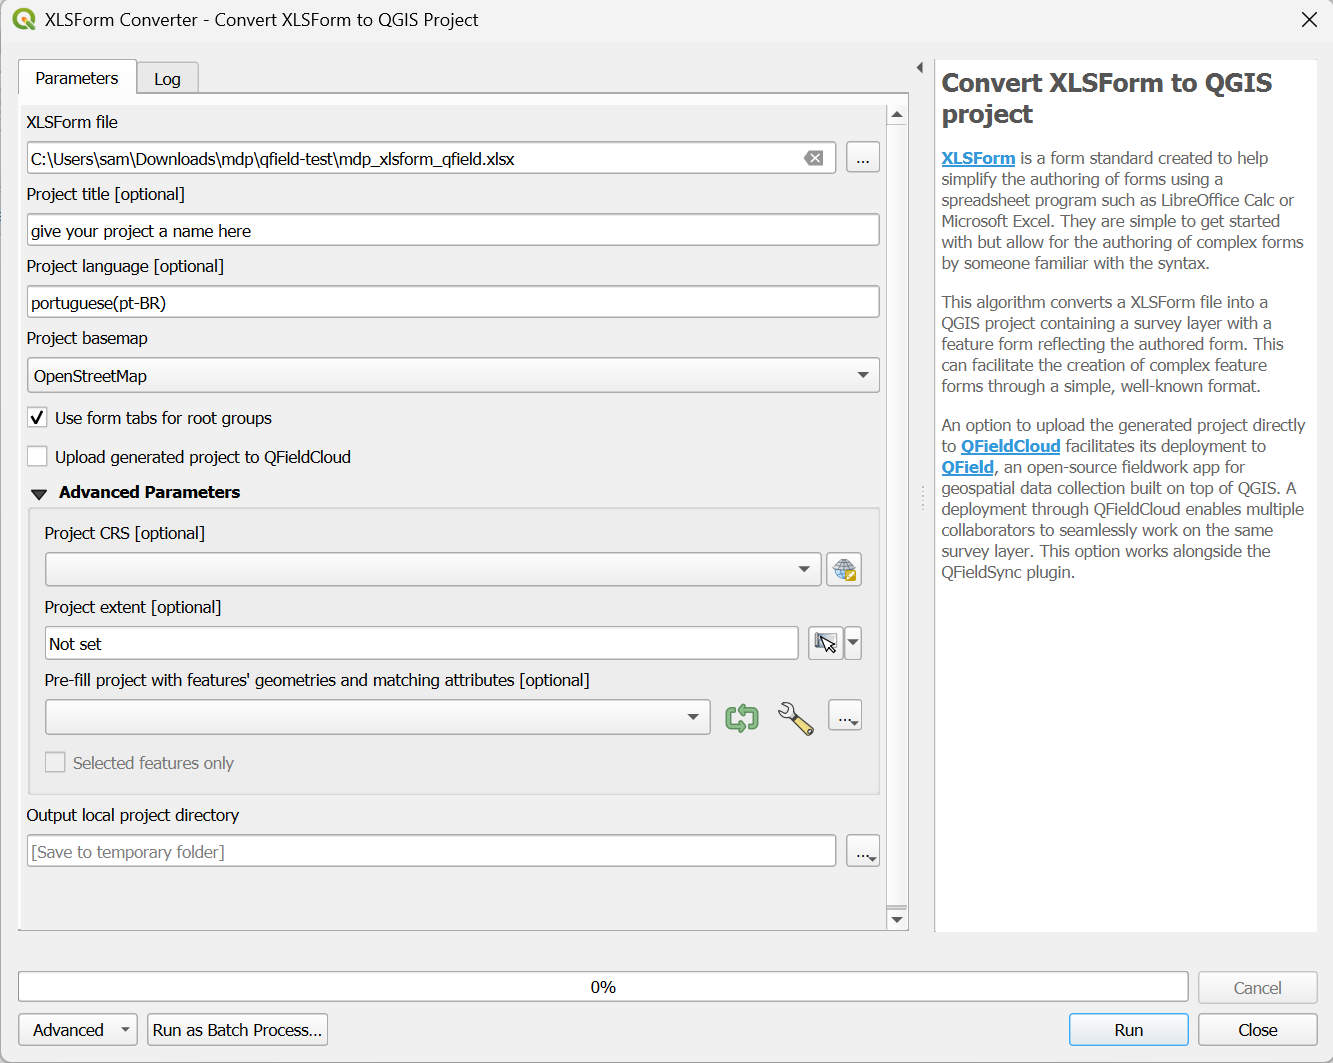
- Select the XLSForm you have created as the first field.
- Ensure the 'Project language' matches exactly what is defined in the XLSForm.
- If you are mapping existing geometries, here you can load the layer into QGIS, then select this layer to 'Pre-fill the project...'.
- It is also a good idea to load the project AOI into QGIS, then select this layer as the 'Project Extent'. This will ensure QField zooms to this location on first load (if you don’t do this, users will have to navigate to the AOI manually or using GPS).
- It's good to select the project CRS as standard (EPSG:4326 generally).
- Once you have completed this, a survey layer will be added to your QGIS project. By default, this will output to a temporary directory. Open the project in the temporary directory to continue.
- You can then add a boundary for the AOI and a basemap as you would in any normal QGIS project.
3. Configure The Project Further
- You can configure the project in any way that you like, within the constraints of what you can do in QGIS (eg. styling, labels, etc). QField users will see those same styles when they use the app.
- Basemaps such as satellite or drone imagery can be added as layers, into a 'mutually exclusive' basemap group if preferred.
- Symbology can be updated to vary based on data type. For example, if a question asks the user to define the feature 'category', the symbol on the map can reflect the categories (with a legend).
- You may wish to add additional layers to the project, e.g.:
- Task boundaries with mapper assignments.
- Location of cell towers to get phone signal.
- Contours to show terrain.
- Other georeferenced data, such as scanned in archive maps, or drawn community maps.
4. Syncing The Project To The Cloud
- Install QField Sync in QGIS.
- You need to register an account at https://app.qfield.cloud.
- QField Cloud is the bridge between QGIS and the users' interaction with the project.
- Log in to QField via the QField Sync plugin in QGIS.
- Click on the cloud icon and click create new project.
- Choose 'Convert currently open project to a cloud project'.
- Add a name, choose HOTOSM as the owner, then convert and upload.
5. Open In The QField App
- Load the QField app and log in with your account.
- Download the newly created project and open it.
- It's possible to share the project with other users by a QRCode to scan.
- Mapped data can be synced at an interval (defined in the QFieldSync project settings), or manually by the user.
- The manager can then sync the uploaded data into their desktop QGIS project, to track progress.